*ePSXe v1.70
ePSXe merupakan emulator terbaik bagi PlayStation. Emulator ini berdasarkan pada plugins. Dengan plugins yang ada, anda dapat meningkatkan kualitas graphic maupun sound sesuai dengan kemampuan komputer anda.
ePSXe v1.7.0 + BIOS + Plugins
ePSXe v.1.7.0 yang telah diintegrasikan dengan BIOS dan Plugins yang diberikan diatas. Khusus bagi mereka yang bingung menentukan harus dimasukin kemana BIOS dan Pluginsnya atau bagi mereka yang malas mendownload satu-satu dan memasukannya sendiri.
Download
Code:
http://www.mediafire.com/?h3z5iezh5zy
Code:
Night Walker@www.kaskus.us
Required:
P200 MMX
256 MB RAM
Good 3D card
Recommended:
PII 500 --> Pentium III 600Mhz-1Ghz lebih disarankan
512 MB RAM
DirectX/OpenGL compatible card
ePSXe v1.70 Graphic Plugins Configuring Tutorial:
Untuk grafik card yang sdh mendukung opengl2 gunakan Pete’s OpenGL 2, yang belum mendukung opengl2 gunakan Pete’s DX6 D3D atau Pete’s OpenGL, kalo menurut gw kualitas gambar yang dihasilkan kurang lebih sama...
Untuk mengakses grafik plugin
* epsxe klik config kemudian pilih video
* PSXeven klik advanced pilih tab plugin manager
Pete’s DX6 D3D
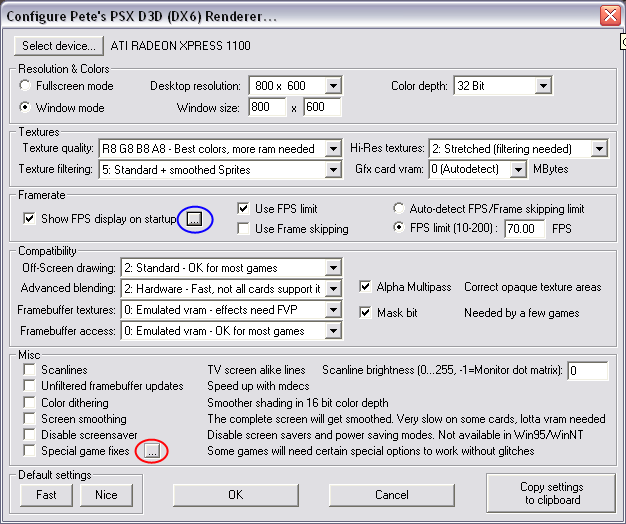
contoh gambar chrono chross pake Pete’s DX6 D3D

Resolution & Color
Sdh cukup jelas rasanya kalo lihat dari gambar langsung.....
gw lebih prefer window mode daripada full screen tapi itu tergantung selera masing2 orang....

Untuk color depth set aja 32 bit
Texture
Settingan disini akan berpengaruh pada kualitas grafik dari game....
Untuk "texture quality" set aja R8 G8 B8 A8 (paling bagus)
Untuk “texture filtering” pilih aja dulu “standard + smoothed sprites”, kalo ga sesuai silakan dicoba2 sendiri karena setiap game punya settingan yang paling sesuai. Perlu diingat tidak semua game mendukung filtering sehingga kadang2 muncul glitches, kalau terjadi seperti itu matikan “texture filtering”....
Untuk "Hi-Res textures" juga silakan dicoba2 sendiri.... sebagai contoh untuk crono chross kalo di set 2×sal muncul artifak2 hitam...sehingga lebih cocok kalo di set stretched
Framerate
Kalo mau melihat FPS selama dalam game centang “show FPS display on startup”
Karena komputer sekarang sdh lebih dari mampu menjalankan emulator ps sehingga biasanya framerate-nya bisa mencapai 100 lebih, centang “use fps limit” untuk mengatasi masalah ini. Set FPS limit 60 (standard) tapi biasanya gw set 70 biar cepet
... FPS limit bisa dihilangkan dengan menekan “9” (default, bisa diubah dengan menset-nya melalui tombol yg dilingkari biru) sehingga berfungsi seperti tombol fast forward
... cocok untuk main game RPG karena battlenya bisa dipercepat kalo bosan .....Compatibility
Set aja dulu sesuai gambar, settingan di sini juga spesifik untuk setiap game. Untuk kasus misalnya tidak ada battle menu di FF9 bisa disebabkan settingan di sini tidak sesuai....
Misc
Centang “special game fixes” dan klik tombol yang dilingkari merah, centang sesuai kebutuhan....tapi selama ini ga pernah gw pake...
Pete’s OpenGL
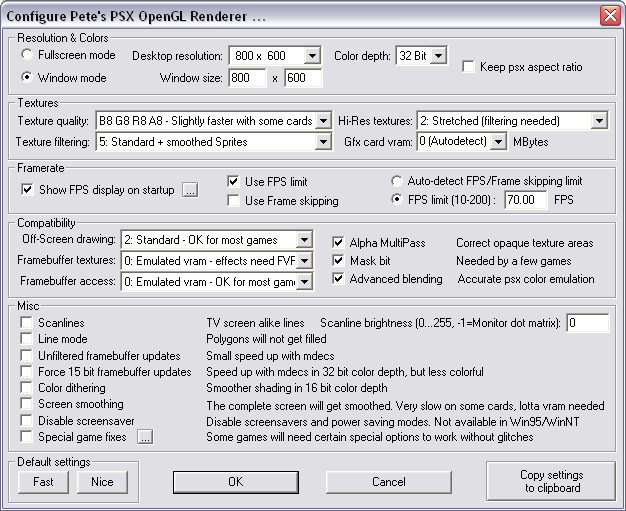
Konfigurasinya mirip dengan Pete’s DX6 D3D jadi sudah cukup jelas.....
Pete’s OpenGL2
Jangan gunakan plugin ini jika grafik card tidak mendukung OpenGl2 atau km akan mendapat nice screen error...
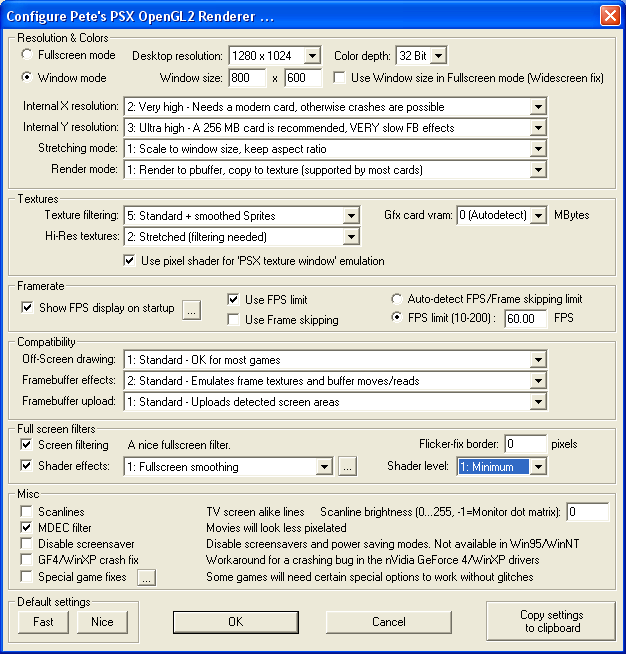
contoh gambar chrono chross pake Pete’s OpenGL2

Resolution & Colors
Centang “use window size in Fullscreen mode (Widescreen fix)” untuk para pengguna widescreen, ini mencegah gambar di stretch ke sisi kanan dan kiri secara berlebihan dengan memberi border hitam pada sisi kanan dan kiri
Untuk kebanyakan grafik card gunakan settingan “high” untuk “internal X resolution” dan “very high” untuk “internal Y resolution”. Untuk settingan yang lebih tinggi diperlukan setidaknya Geforce 6xxx/7xxx atau ATI 1xxx
Untuk “stretching mode” pilih aja “stretch to full window size” atau km bisa gunakan mode yang lain...settingan ini hanya mengontrol bagaimana gambar akan di stretch pada display monitor...
“Render mode” hanya mengatur plugin bagaimana bekerja secara internal, output untuk semua mode sama tetapi tergantung juga pada hardware kadang2 ada mode yang tidak bekerja sama sekali...
TIPS
Jika plugin crashed pada startup, coba ganti “Render mode” dengan yang lain, disable pixel shader option dan turunkan “internal X/Y resolutions”...
Textures
Untuk “texture filtering” pilih aja dulu “standard + smoothed sprites”, kalo ga sesuai silakan dicoba2 sendiri karena setiap game punya settingan yang paling sesuai. Perlu diingat tidak semua game mendukung filtering sehingga kadang2 muncul glitches, kalau terjadi seperti itu matikan “texture filtering”....
Untuk “Hi-Res textures” juga silakan dicoba2 sendiri....
Centang “use pixel shader for ‘PSX texture window’ emulation” untuk emulasi yang lebih akurat dan cepat dari PSX “texture window”...option ini hanya tersedia untuk grafik card yang mendukung DX9
Framerate
Kalo mau melihat FPS selama dalam game centang “show FPS display on startup”
Karena komputer sekarang sdh lebih dari mampu menjalankan emulator ps sehingga biasanya framerate-nya bisa mencapai 100 lebih, centang “use fps limit” untuk mengatasi masalah ini. Set FPS limit 60 (standard) tapi biasanya gw set 70 biar cepet
... FPS limit bisa dihilangkan dengan menekan “9” (default, bisa diubah dengan menset-nya melalui tombol yg dilingkari biru) sehingga berfungsi seperti tombol fast forward
... cocok untuk main game RPG karena battlenya bisa dipercepat kalo bosan .....Compatibility
“Off-Screen drawing” pilih “1: standard”, jika menemui glitches coba ganti menjadi “0” atau “2”
“Framebuffer effect” pilih “2 : standard”, atau bisa mencoba “3: Full” jika spec cukup tinggi
“Framebuffer upload” pilih “1: standard” for best choices

Full screen filters
“Screen filtering” menyebabkan sedikit efek blurr pada display, gunakan jika suka dengan efek ini
“Shader effects” silakan coba2 sendiri untuk hasil terbaik...bisa menyebabkan sedikit lambat tapi tdk terlalu banyak
Misc
Centang “MDEC filter” supaya FMV terlihat lebih halus
Centang “special game fixes” dan klik tombol “...”, centang sesuai kebutuhan....
---------------------------------------------------------------------------------------------------------------------------------------------
ePSXe1.70 Quick Tutorial for Totally Newbiez
NOTE: If you can't sure how to configure the plugins, just follow my configuration at the picture which I use as ilustration. They are runs great at my system
1. First thing first you need to extract the plugins to plugins folder

2. Extract the BIOS to BIOS folder

3. Run ePSXe.exe and you will find open window like this:

4. Now, you need to set up for Video, sound, cdrom ,BIOS, and Memory Cards. Select config and you'll find dropdown menu like this:

5. Video. Select config-->Video
a. Choose plugin you want to use:

b. Configure it. For complete tutorial, please go to ePSXe v1.70 Graphic Plugins Configuring Tutorial section.
Or, you can see the picture below for some example:


6. Sound. Select Config-->Sound
a. Choose plugin you want to use:

b. Configure it:

7. CDRom. Select Config-->Cdrom
a. Choose plugin you want to use:

b. Configure it:

Please note, you must be right at configuring the drive letter. For example, your DVD ROM is (F: ) and your virtual drive is (G: ). If you choose to use virtual drive, then you need to choose (G: ) and vice versa.
8. BIOS. Select Config-->BIOS
Press select and then locate where the BIOS folder and choose one of the BIOS you wat to use

9. Memory Cards. Select Config-->Memory Cards
Press select then locate where you want to store the virtual memory cards file.

It usually store at memcards folder at ePSXe directory folder, like this:
choose epsxe000.mcr for Memory Cards 1 and epsxe001.mcr for Memory Cards 2.
10. Gamepad.
If you have gamepad for PC, you can use it to play instead using keyboard. Just go to Config-->Gamepad-->Port1-->Pad 1
Configure it! First you need to click the button showned at the display then you must press the coressponding button at your game pad. Below the example, if you use gamepad with vibration feature:

And below are example if you use keyboard rather than game pad:

11. Play the game!
a. First insert the game CdRom or mount it at your virtual drive.
b. Choose File-->Run CDROM

12. Save State function.
You can use Save State rather than save at virtual memory cards. The benefit is, This Is Actually Save Anywhere Function, so you can save it anywhere an load right at the place you save. Pretty usefull function, huh?
F1: Save State
F2: Choose slot to save (Different game will automatically generate different slot to save, so it wont overwrite your save)
F3: Load State
PlayStation2
Emulator:
Pcsx2 0.9.6 r1888 [Including BIOS+Latest Plugins] - 09 August 2010
Code:
http://www.maknyos.com/di8o9o721ui0/Pcsx2_0.9.6_r1888__Including_BIOS_Latest_Plugins__-_09_August_2010-maknyos.com.7z.html
Code:
Night Walker@www.kaskus.us
Code:
http://down.emucr.com/W9NLOLEVZT
Install This 1st Before Using Latest SVN of PCSX2:
Code:
C++2008 :
http://www.microsoft.com/downloads/details.aspx?familyid=A5C84275-3B97-4AB7-A40D-3802B2AF5FC2&displaylang=en

C++2010 :
http://www.mediafire.com/?hzz2mnvn4ya

If you still get error message, install this alo:
.NET Framework 3.5
http://download.microsoft.com/download/6/0/f/60fc5854-3cb8-4892-b6db-bd4f42510f28/dotnetfx35.exe
.NET Framework 3.5 SP1
http://download.microsoft.com/download/2/0/e/20e90413-712f-438c-988e-fdaa79a8ac3d/dotnetfx35.exe
SETTING PCSX2
1. settingan plugin (config->configure)

amd mentok pake yg SSE2, intel bisa yg SSSE3 atau SSE41
2. graphic

3. controller (as requested)


kalo mao getar tinggal klik small motor n big motor, ga usa pusing liat option di dalemnya karena ntar lo tinggal klik ok aja
4. sound

5. cdvd juga gw skip (ga usa dijelasin pasti tau sendiri)
6. dev9, usb, firewire diskip aja (ga kepake)
7. cpu

buat dual core : ikutin gambar
buat quad core : bisa dicentang bagian microvu (2-2nya), gunakan kalo FPS yg anda dapat kecil saja, sebab masih bisa crash
8. patches (skipped, ini buat advanced user)
9. gamefixes (centang yg sesuai game yg lo maenin)
10. speedhack

EE sync bagian kiri bisa diatur sesuka hati (hati komputer tentunya)
EE misc hack juga bisa dicoba2 sendiri sesuka hati (liat atas)
VU hack KHUSUS BUAT PENGGUNA QUAD CORE!!!, bisa dicoba2 sendiri juga
11. advanced (buat advanced user juga)
speks minimal gw gak tau, kalo mao nyaman minimal gunakan processor dual core minimal 2,8GHz~3GHz, RAM 2GB, VGA 8600GT/4670 ke atas
spek gw? jgn disebutin, ntar gw dosa malah ngeracunin orang upgrade komputer
{ 0 komentar... read them below or add one }
Posting Komentar